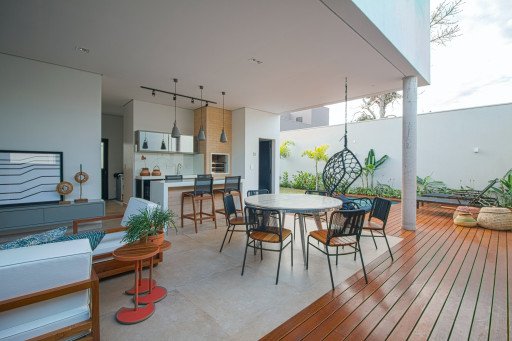
Setting the Stage for Your Culinary Creation
Imagine a central hub in your kitchen, brimming with the promise of gastronomic adventures and efficiency. Building a Build Your Own DIY Kitchen Island elevates your space from mere cooking quarters to a multifaceted arena of creativity. This heart of the home is where functionality meets personalized flair.
Visionary Planning for Optimal Utility
Deliberate over your island’s desired attributes—dimensions harmonizing with your cookery’s scale and a configuration that effortlessly aligns with your culinary workflow. To amplify its utility and allure, contemplate integrating built-in conveniences such as shelves and drawers, or perhaps a cozy breakfast nook.
Materializing Your Vision
Ascend from conception to reality by choosing materials like oak or quartz that not only echo your kitchen’s character but also promise longevity. Arm yourself with essential tools—saws, drills, and the like—to navigate smoothly through each building stage.
Design Personalization
Let your kitchen island be a reflection of your needs. Whether it’s bar-style seating for social brunches, abundant compartments for culinary instruments, or open niches for your cherished spices, tailor your blueprint to your personal epicurean narrative.
Laying The Foundation of Your Kitchen Masterpiece
The groundwork of your island is paramount. Erect a steadfast frame to shoulder the countertop and extras. Employ robust joinery to ensure a lasting edifice, paving the way for generations of kitchen dalliances.
Kitchen islands have burgeoned in popularity for their versatility and functionality—a trend you’re now partaking in.
Countertop Installation
Your choice of countertop should strike a balance between resilience and style. When mounting it atop your base, aim for seamless alignment and a leveled surface, sealing it meticulously to ward off damage and wear.
Innovative Storage Mechanisms
Expand your island’s function with ingenious storage solutions. Glide-in drawers, customizable cabinetry, and unique organizers are just a few ways to streamline your culinary space and bid adieu to clutter.
Additional Features: The Icing on the Cake
To truly claim multifunctional glory, introduce elements like an inbuilt chopping station or pots and pan holder. Consider the convenience of power outlets for your gadgets, or even a small prep sink for easy tidying up.
The Final Flourishes
Embellish your island with accents reflective of your essence—be it through artisanal knobs, a splash of color, or lights that both accentuate and illuminate your newfound pride.
Championing Safety and Longevity
In the throes of creation and beyond, prioritize safety and smooth finishes. Embrace regular upkeep—tightening, oiling, polishing—to ensure your island remains a pivotal piece of your kitchen repertoire.
Embracing Eco-conscious Building
Evoke the spirit of sustainability by utilizing reclaimed woods or eco-friendly choices. Lean towards health-conscious options like low-VOC coatings and invest in energy-conserving LED lighting to illuminate your efforts.
Final Words on Crafting Your Kitchen Centrepiece
The journey to build your own DIY kitchen island is a path paved with increased practicality, stylistic customization, and the inherent joy of crafting something with your own hands. With thoughtful planning and discerning material selection, you’re not just constructing an island—you’re enhancing your home’s soul.
contemporary crafting techniques revitalize traditional arts
Related Posts
- Contemporary Crafting Techniques: 5 Ways to Revitalize Traditional Arts
- 7 Essential Steps to DIY Tree House Building: Your Dream Sanctuary Awaits
- Mastering the Art of Homemade Crafts: A Comprehensive Guide to DIY Projects
- DIY Screen Room Construction Guide: 7 Essential Steps to Your Personal Oasis
- 5 DIY Acoustic Treatment Techniques for Enhanced Audio Quality